
“Use React in a WordPress theme” is our previous article in which we started speaking about the combination of React and WordPress. We spoke about the whys and hows, and the benefits. In this article, we will speak about the implementation and show examples of how to embed React components in a WordPress theme. Read on.
Making WordPress Understand React, A.K.A. THE BUILD PROCESS
We glanced into the configuration, combination of technologies, and tasks we use to compile and “enable” React in our themes in the previous blog post we mentioned above. Here, we’ll dive deeper, and explain how we do it in much more detail.
Since we are not building a single-page application in this scenario, we will not be using “create-react-app”. Instead, to embed React apps into WordPress we will need to configure the build process that compiles our React components manually. It’s a combination of these technologies.
- WebPack
- Gulp
- Babel

Why a Combination of Tools Instead of only using WebPack
Yes, we could compile and build our theme only with WebPack, but we don’t like the idea of processing and importing SCSS files into Javascript, and gulp-sass has proven itself to be a much faster SCSS processor than webpack, plus with many available Gulp plugins, it can be configured to do more. WebPack, on the other hand, is a better solution for processing Javascript. Because of those reasons we’ve decided to combine Gulp and WebPack. A few years ago, we’ve been processing Javascript code with Gulp as well, but since WebPack emerged and proved itself to be the best Javascript bundler and transformer on the market, we’ve decided to make a switch, and we never went back. Gulp, as a task runner, WebPack, as a JS bundler, and Babel, as a compiler made a reliable and fast solution for us, and a winning combination.
WebPack
Taken from their documentation, WebPack is a Javascript module bundler. Primarily, it is made for Javascript, but it can work with, and transform other front-end assets such as HTML, CSS, and images. To do so, WebPack uses loaders that are appropriate for the task at hand. We use it to bundle our theme’s vanilla and JSX code, thus, making it possible to embed react components.

Gulp
Gulp is our preferred task runner. It allows us to automate repetitive and slow tasks such as SCSS compilation, browser reloading, or injecting CSS. BrowserSync plugin makes it really easy for us to get live reloads and test on multiple browsers and devices while developing. It’s fast, reliable and its syntax, which mainly consists of “pipes”, is really easy to understand. You can make it your own and configure it to do almost whatever you can imagine to improve your workflow.
Babel
Babel compiles our Javascript. Actually, it is a transcompiler. It allows us to write modern Javascript that it then converts into a backward-compatible code that the browsers or other environments that run on older JS engines can understand.
Check out our open-source WordPress starter theme
It supports React, Vue and Svelte, includes a framework for creating custom Gutenberg blocks, and so much more. You will love it.
Embedding and Rendering React Components on the Front-End
To make it possible to embed react apps in our WordPress theme we will need to configure a few files properly and install NPM packages that help us do that.
We will be creating and configuring these files: gulpfile.js, .babelrc, webpack.config.js, webpack.config.prod.js, gulptasks.js, and lastly, package.json.
gulpfile.js
Our task runner configuration file. For this example, we configured our gulp to watch for updates and call SCSS and Javascript compilation tasks. Since we are speaking about embedding react apps in this post, we will focus on JS and React-related code.
doThemeJS is a function that calls the compileJS task that’s defined and exported in gulptasks.js file. Then inside the watchFiles function, we watch for Javascript files updates and call the doThemeJS function.
Here’s what the gulpfile.js looks like:
const gulp = require('gulp')
const sass = require('gulp-sass')(require('node-sass'))
const autoprefixer = require('gulp-autoprefixer')
const gcmq = require('gulp-group-css-media-queries')
const minifycss = require('gulp-uglifycss')
var plumber = require('gulp-plumber')
var notify = require('gulp-notify')
const { argv } = require('yargs')
const browserSync = require('browser-sync').create()

const tasks = require('./tasks/gulptasks.js')

const LOCALHOST_PROJECT_URL = 'localhost/react-test'

process.env.NODE_ENV = argv.production || 'development'

const watchPaths = {
  css: {
    theme: './src/scss/theme/**/*.scss',
  },
  js: {
    theme: './src/js/**/*.js',
  },
}

const OUT_DIR = './prod'
const srcSCSS = './src/scss/style.scss'

function compileSCSS() {
  return gulp
    .src(srcSCSS)
    .pipe(
      plumber({ errorHandler: notify.onError('Error: <%= error.message %>') })
    )
    .pipe(
      sass({
        errLogToConsole: false,
        outputStyle: 'compact',
        precision: 10,
      })
    )
    .pipe(autoprefixer())
    .pipe(gcmq())
    .pipe(
      minifycss({
        maxLineLen: 1000,
        uglyComments: true,
      })
    )
    .pipe(gulp.dest(OUT_DIR))
    .pipe(browserSync.stream())
}

function doCSS(done) {
  return gulp.series(compileSCSS, (done) => {
    done()
  })(done)
}

function doThemeJS(done) {
  return gulp.series(tasks.compileJS, reload, (done) => {
    done()
  })(done)
}

function reload(done) {
  browserSync.reload()
  done()
}

function watchFiles() {
  browserSync.init({
    proxy: LOCALHOST_PROJECT_URL,
    injectChanges: true,
  })

  // Watches for theme scss updates
  gulp.watch(watchPaths.css.theme, doCSS)
  gulp.watch(watchPaths.js.theme, doThemeJS)
}

gulp.task('default', watchFiles)
gulptasks.js
Here, we’ve defined and exported a function that we call from our gulpfile. The function in this file depends on the webpack.config.js file.
const { argv } = require('yargs')
const webpack = require('webpack')

process.env.NODE_ENV = argv.production || 'development'

const webpackConfig =
  process.env.NODE_ENV === 'production'
    ? '../webpack.config.prod.js'
    : '../webpack.config.js'

function compileJS(done) {
  return new Promise((resolve, reject) => {
    webpack(require(webpackConfig), (err, stats) => {
      if (err) {
        return reject(err)
      }

      if (stats.hasErrors()) {
        return reject(new Error(stats))
      }
      resolve()
      done()
    })
  })
}

exports.compileJS = compileJS
webpack.config.js
In the WebPack config file, we are telling it to compile our Javascript and JSX syntax. In this specific configuration, we have two entry files that we are watching and compiling: app.js, which lives in the /src/js/app.js of our theme, and react.js, which lives in /src/js/app-react.js in our theme. They are compiled and renamed into the /prod directory of the theme. They become app.min.js and react.min.js, which we then enqueue.
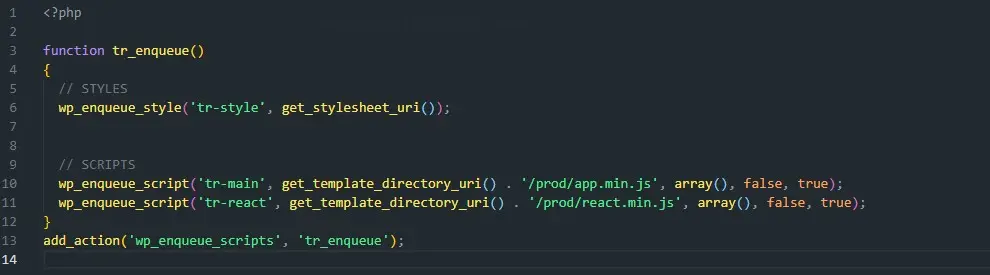
Here’s the webpack.config.js code:
const path = require('path')
const outputDir = path.resolve(__dirname, 'prod')

module.exports = {
  mode: 'development',
  entry: {
    app: path.resolve(__dirname, './src/js/app.js'),
    react: path.resolve(__dirname, './src/js/app-react.js'),
  },
  devtool: 'inline-source-map',
  output: {
    path: outputDir,
    filename: '[name].min.js',
  },
  devtool: 'source-map',
  module: {
    rules: [
      {
        test: /\.js$/,
        exclude: /node_modules/,
        use: ['babel-loader'],
      },
      {
        test: /\.js$/,
        use: ['source-map-loader'],
        enforce: 'pre',
      },
    ],
  },
}
webpack.config.prod.js
This code is run when we use the npm run build:prod command to minimize the code. It uses the Terser WebPack plugin for optimization and minimization.
const path = require('path')
const outputDir = path.resolve(__dirname, 'prod')
const TerserPlugin = require('terser-webpack-plugin')

module.exports = {
  mode: 'production',
  entry: {
    app: path.resolve(__dirname, './src/js/app.js'),
    react: path.resolve(__dirname, './src/js/app-react.js'),
  },
  output: {
    path: outputDir,
    filename: '[name].min.js',
  },
  module: {
    rules: [
      {
        test: /\.js$/,
        exclude: /node_modules/,
        use: ['babel-loader'],
      },
    ],
  },
  optimization: {
    minimize: true,
    minimizer: [
      new TerserPlugin({
        parallel: true,
        terserOptions: {
          ecma: 6,
          format: {
            comments: false,
          },
        },
        extractComments: false,
      }),
    ],
  },
}
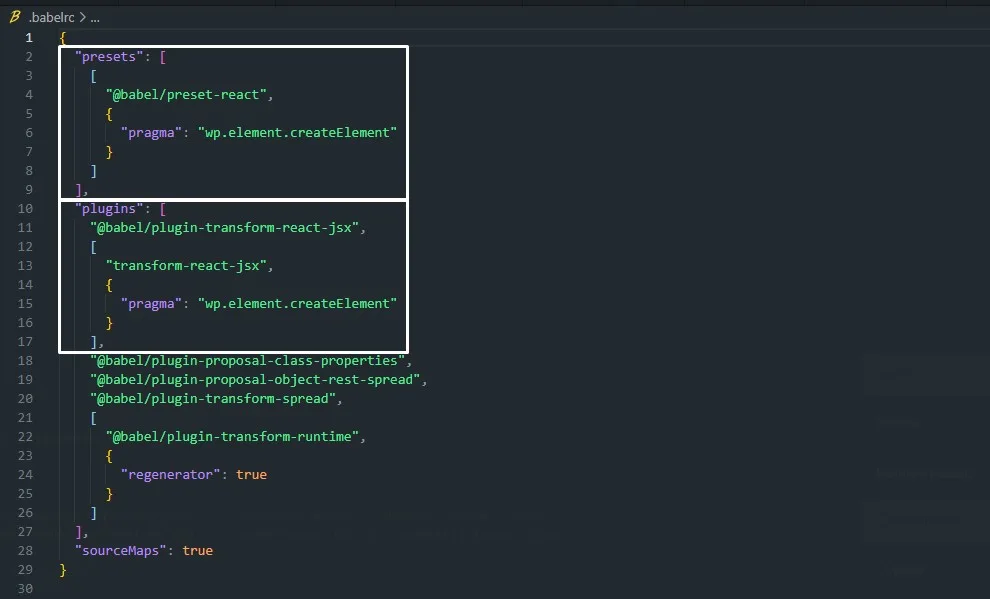
.babelrc
This is the configuration that WebPack uses to know how to transpile the code. The two most important blocks of code are highlighted in the image below. The file is configured to use wp.element.createElement so we can create custom Gutenberg blocks (the admin part), and @babel/preset-react, so we can use React on the front-end on its own (without Gutenberg). If you are not using Gutenberg, you most probably wouldn’t need the pragma part, but even if you leave it, the code will work and will compile React for the front-end.
package.json
Finally, we have the package.json file with defined dependencies and tasks. To start the task runner, watch for changes and compile, run npm start. When you finish and want to minimize the files, run npm run build:prod.
{
  "name": "gulp4-webpack",
  "version": "1.0.0",
  "description": "A modern ES6 Gulp workflow combined with Webpack",
  "scripts": {
    "start": "gulp",
    "build:prod": "gulp --production=production"
  },
  "engines": {
    "node": "14.15.1"
  },
  "author": "Nikola Ivanov - webredone.com",
  "license": "MIT",
  "devDependencies": {
    "@babel/core": "^7.14.8",
    "@babel/plugin-proposal-class-properties": "^7.14.5",
    "@babel/plugin-proposal-object-rest-spread": "^7.14.7",
    "@babel/plugin-transform-react-jsx": "^7.14.9",
    "@babel/plugin-transform-runtime": "^7.14.5",
    "@babel/plugin-transform-spread": "^7.14.6",
    "@babel/preset-env": "^7.14.9",
    "@babel/preset-react": "^7.14.5",
    "babel-eslint": "^10.1.0",
    "babel-loader": "^8.2.2",
    "babel-plugin-transform-react-jsx": "^6.24.1",
    "del": "^6.0.0",
    "eslint": "^7.32.0",
    "eslint-config-prettier": "^8.3.0",
    "eslint-plugin-prettier": "^3.4.0",
    "gulp": "^4.0.2",
    "gulp-autoprefixer": "^8.0.0",
    "gulp-group-css-media-queries": "^1.2.2",
    "gulp-notify": "^4.0.0",
    "gulp-plumber": "^1.2.1",
    "gulp-sass": "^5.0.0",
    "gulp-uglifycss": "^1.1.0",
    "prettier": "^2.3.2",
    "source-map-loader": "^3.0.0",
    "terser-webpack-plugin": "^5.1.4",
    "webpack": "^5.47.1",
    "webpack-cli": "^4.7.2",
    "yargs": "^17.0.1"
  },
  "dependencies": {
    "axios": "^0.21.1",
    "browser-sync": "^2.27.5",
    "embla-carousel": "^4.5.3",
    "node-sass": "^6.0.1",
    "toastify-js": "^1.11.1",
    "uuid": "^8.3.2",
    "react": "^17.0.2",
    "react-dom": "^17.0.2"
  }
}
Rendering React apps in WordPress front-end
With the configuration from above, you should be able to now write and use React components in the front-end of your WordPress theme. In create-react-app, you would render the whole app to the #root element. The idea is the same here, but we are not rendering to one #root element. Instead, we define our own elements, which we then query for and inject our react code into.
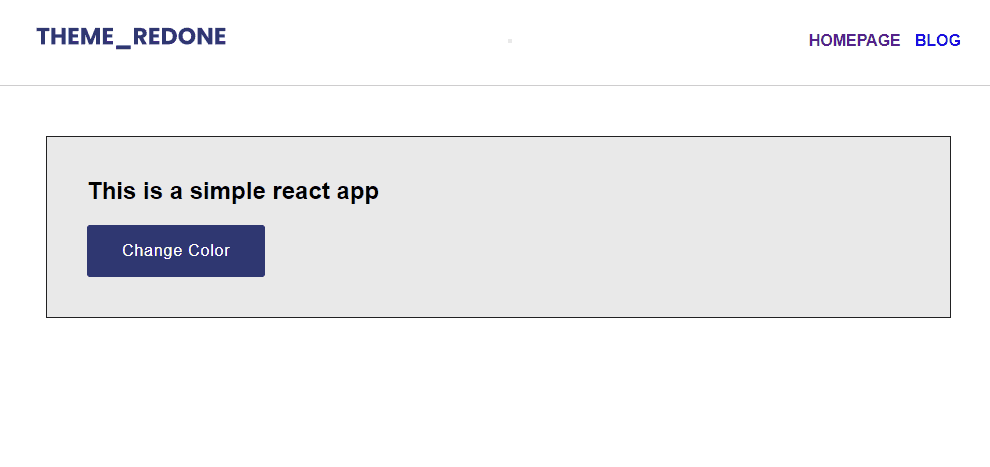
Here’s an example of how to create a simple react app that we attach to the element which has a “test-simple-react-component” class.
app-react.js
We are doing it with a ReactComponents class. Inside its constructor, we define the selectors for elements we want to inject React code into, and then we call the init() method to render the components if we find those selectors on the current page. This simple example shows how to render one component on the element that has the test-simple-react-component class. You would simply add more selectors, checks, and render methods to attach more react components.
import React from 'react'
import ReactDOM from 'react-dom'

import TestSimpleApp from './react-components/TestSimpleApp'

class ReactComponents {
  constructor() {
    this.$test_simple_react_components = document.querySelectorAll(
      '.test-simple-react-component'
    )
    this.init()
  }

  init() {
    if (this.$test_simple_react_components) {
      this.$test_simple_react_components.forEach(($simple_app_wrap) => {
        ReactDOM.render(, $simple_app_wrap)
      })
    }
  }
}

new ReactComponents()
TestSimpleApp.js
This is our component’s code. It’s a simple background-changing app.
import React, { useState } from 'react'

const [color1, color2] = ['#cecece', '#e9e9e9']

const TestSimpleApp = () => {
  const [color, setColor] = useState('#cecece')

  return (
    <div className="test-simple-app" style={{ backgroundColor: color }}>
      <h2>This is a simple react app</h2>
      <button
        className="btn btn--brand"
        onClick={() => setColor(() => (color === color1 ? color2 : color1))}
      >
        Change color
      </button>
    </div>
  )
}

export default TestSimpleApp
Now, wherever you want to show this component, you would just add the element with the corresponding class name. For simplicity’s sake, we are hardcoding it into the front-page file (Note: we are using latte templating engine instead of plain PHP, but you get the idea).
{include tr_view_path('/layout/header')}

<div class="test-simple-react-component"></div>

{include tr_view_path('/layout/footer')}
And, here’s what our example component looks like on the front end.
That’s a wrap
This example only shows a tiny bit of what’s possible when you embed React components into WordPress. Imagine creating dynamic and interactive archive pages, filters, search pages, or animations with React-Spring or Framer Motion.
If you haven’t, make sure to read our previous article about this topic.